
TL;DR
My characters stay the same person across an ad now.
My rooms didn’t: turn the camera around and the stove moves walls, a second door appears, a man teleports back to the couch.
- The cause: every shot is made from one picture plus some words, so everything outside that picture gets invented again, differently, every time.
- What fixed it: a location sheet, the same idea as a character sheet but for a room. You write down all four walls first, draw the room from four angles, and every shot starts from the angle it faces.
- What fixes the rest: I stopped re-rendering. Seedance 2.5 can edit an approved clip: take out a stray object, change a gesture, or keep the good half and regenerate the rest. For camera notes, four AI editors lost to a plain crop.
Below is every test, side by side, including the one I threw away.
In this post
- The problem: rooms that won’t sit still
- Why AI rooms move between shots
- Test 1: build the room in 3D
- Test 2: location sheets
- Test 3: start from a real 360° panorama
- The other half: who stands where
- Test 4: fix the clip instead of re-rendering it
- Changing the camera after the fact
- The rules I run on now
- FAQ
The problem: rooms that won’t sit still
So I’d solved characters.
Character sheets, a passport-style headshot, four panels, and the same person turns up in every shot.
That took a while, but it holds.
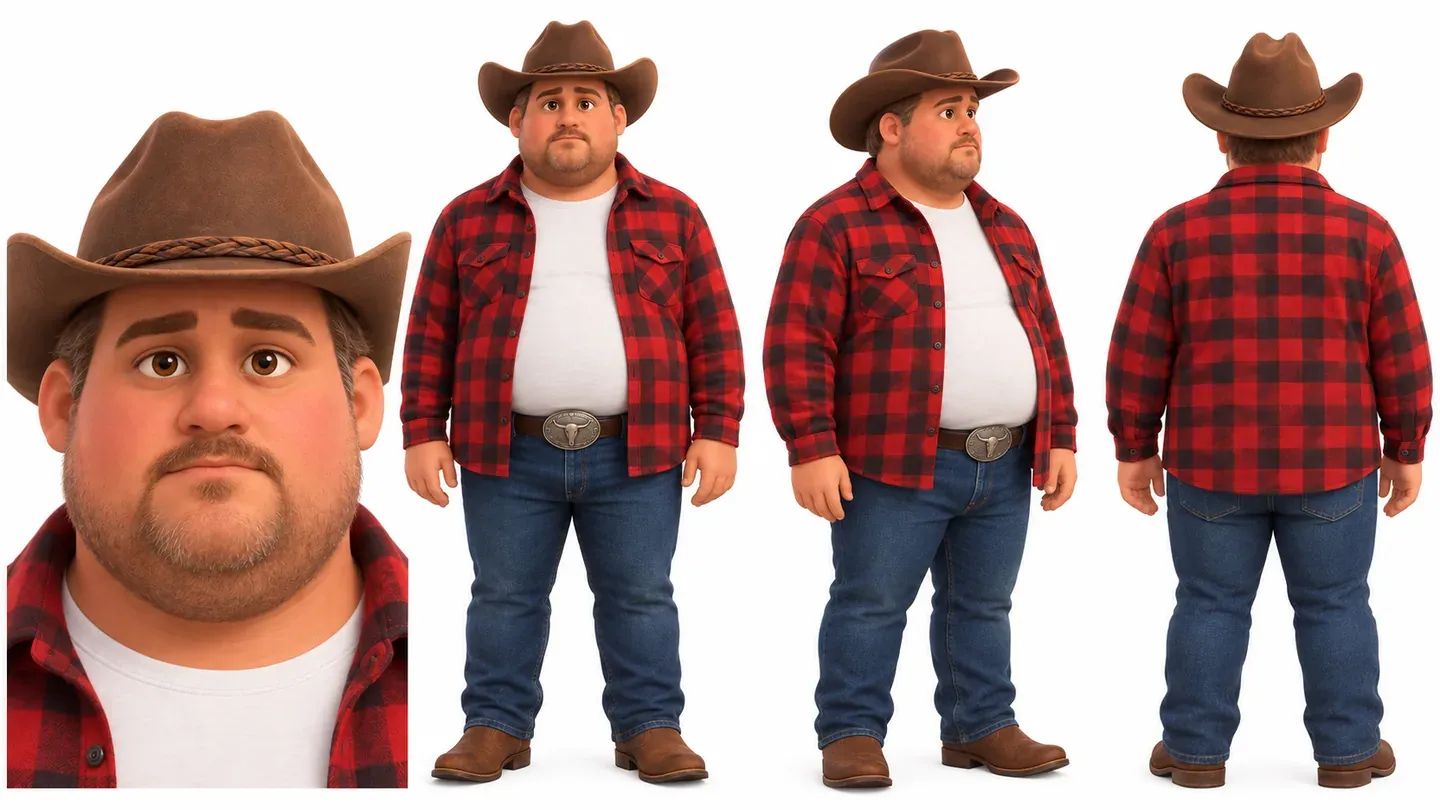
One sheet, four views. Every shot of him starts from this, so there’s nothing left to guess.
The next thing that kept coming back in my notes was the room.
Not the lighting, not the style: where things are.
A couple of real notes from my own reviews:
- “The couch behind him, and when he turns again the man is back on the couch. There should be spatial awareness.”
- “She’s supposed to be on the other side of the bed.”
- “The environment isn’t constant, and his position in the hospital room isn’t consistent.”
Before building anything, we went back through every correction I’d given on past ads and sorted them.
That changed the plan.
Most of my notes were direction: push into this, not that; she’s smirking, not disappointed; cut every 2 seconds.
No room trick fixes those.
Of the notes about position, about half were the room itself (a wall, a prop, a door in the wrong place) and about half were people in the wrong place in the room.
So there are two problems, not one.
Keep that in mind, because the fix for the second one is basically free.
Why AI rooms move between shots
Here’s the thing people miss.
A video model doesn’t have your room.
It has one picture and some words.
When the camera faces the stove, the model can see the stove.
When you cut to the reverse angle, it’s looking at a wall nobody has ever shown it.
So it invents one.
Next shot, it invents another.
Each is plausible on its own, and together they’re three different kitchens.
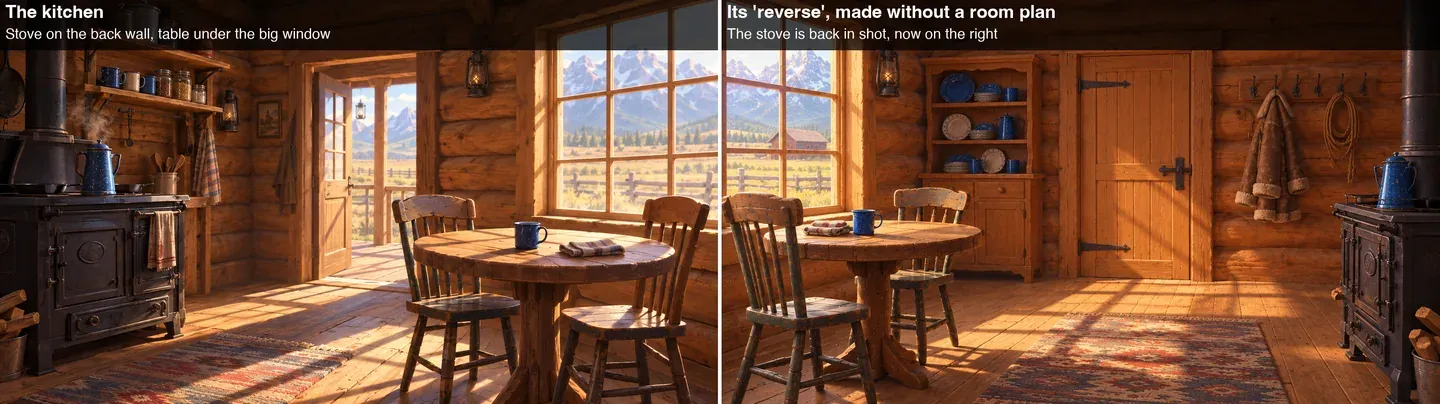
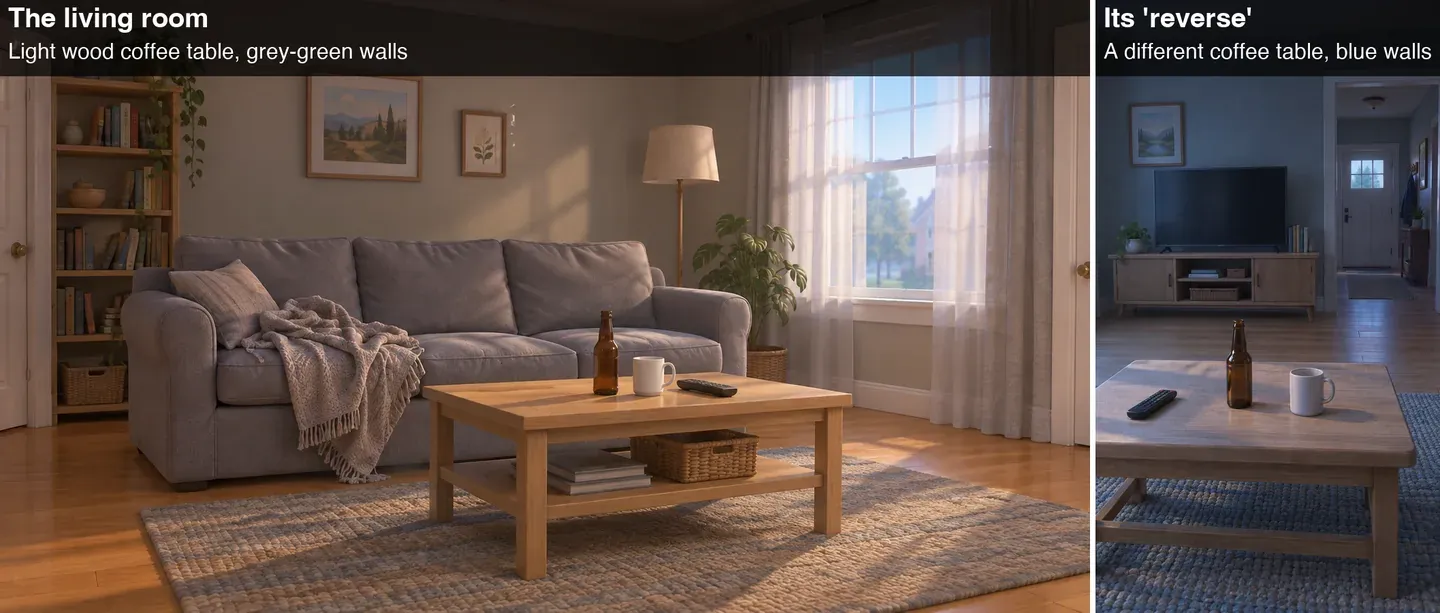
Two reverse angles I made before I had a system. The kitchen’s stove is back in shot on the wrong side. The living room’s coffee table and wall colour changed completely.
It’s the same reason one reference photo isn’t enough for a character: the model has to guess the back of the head, and it guesses differently every time.
A character sheet fixes that by showing every side.
Rooms need the same thing.
Test 1: build the room in 3D
The obvious move: if the model can’t hold a room in its head, give it an actual 3D room.
I tried two versions.
First, Marble (World Labs), which turns one image into a 3D world you can fly a camera through.
It works near the spot the picture was taken from.
Move the camera far away and the room goes soft and wrong.
And when I gave it two pictures of the same room from different spots, it built the room with two coffee tables.
Then a proper 3D scene builder: real walls, a real stove, a real table, a grey stand-in figure walking the path, and the camera move rendered out and handed to Seedance 2.5 as a guide.
Left: the 3D-guided shot. Right: the same shot made from a single flat picture of the room.
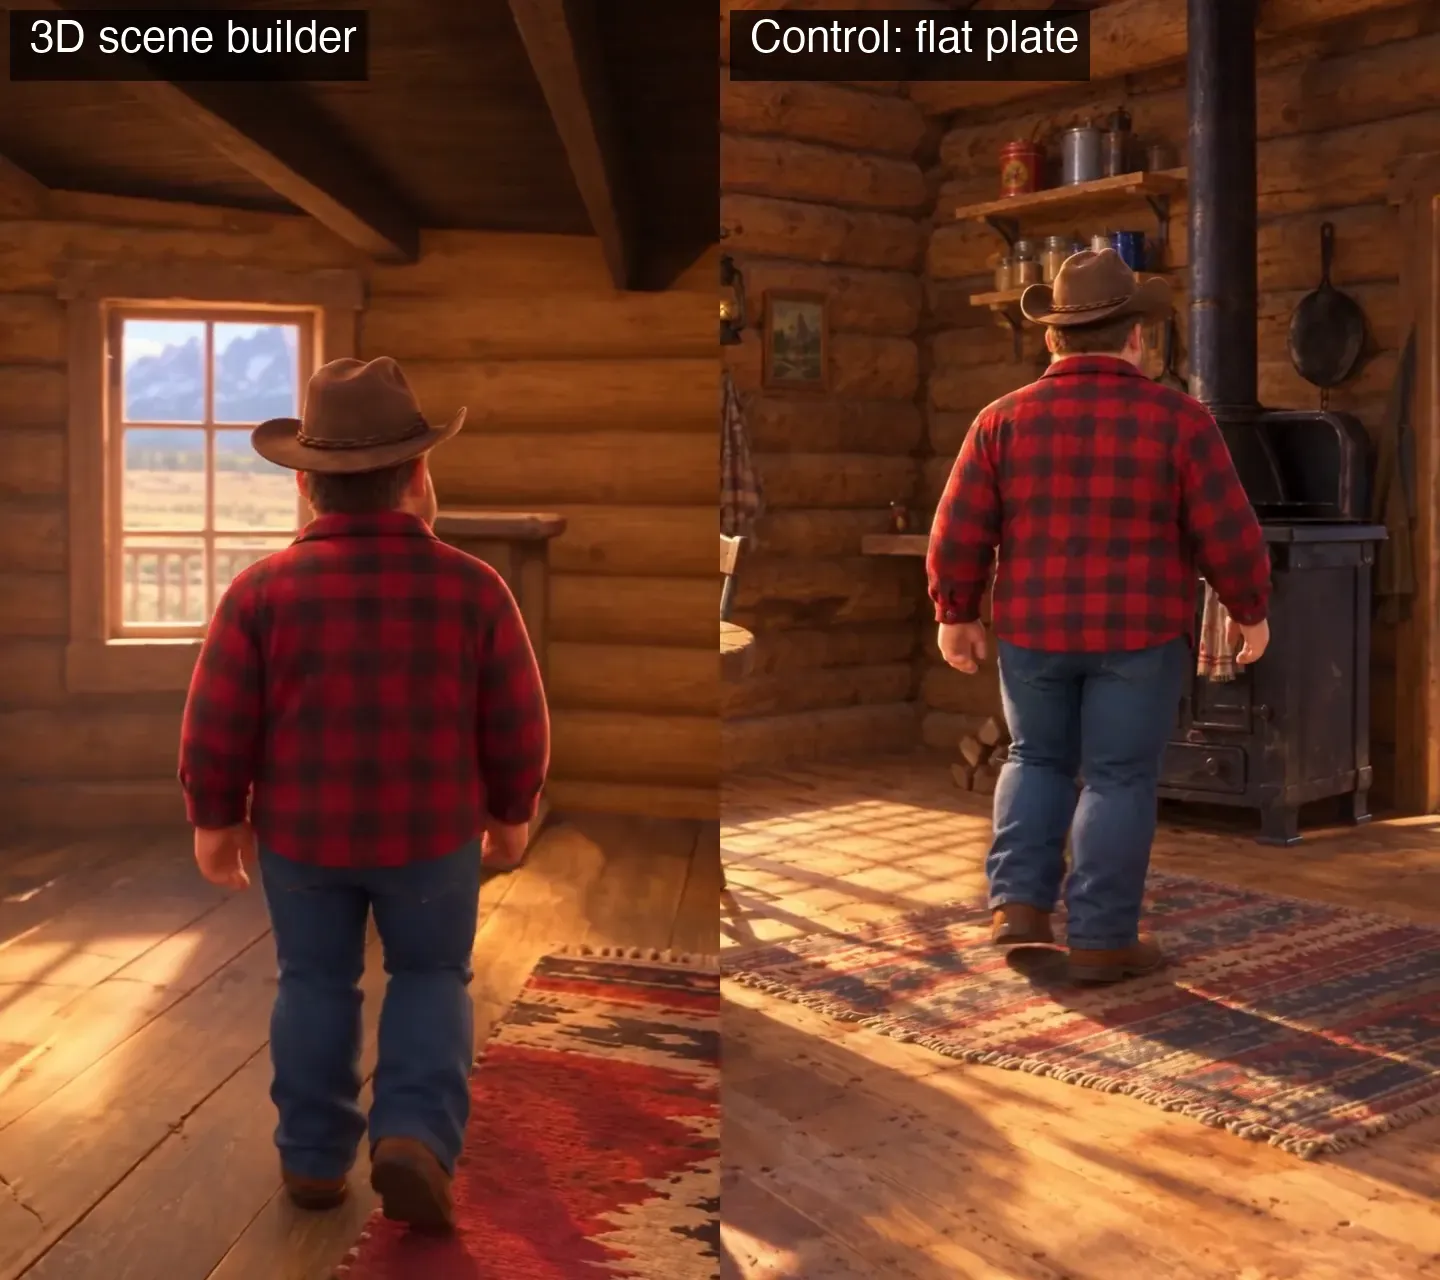
This is the reverse angle, the shot looking back into the room.
The 3D version (left) shows the correct wall.
The flat-picture version (right) put the stove on the wall he’s walking toward, which is the opposite side of the room.
The flat picture mirrored the room.
So 3D worked.
And I still said no.
It looked 3D.
Not like my ad, which is Pixar-style but painterly and warm.
And it was slow: build the walls, place the furniture, fix the camera going through the cupboard, render, then paint over it.
For one room.
If the fix is slower than the problem, it’s not a fix.
Test 2: location sheets
So I went back to what already works for characters and asked the obvious question: why not a sheet for the room?
A location sheet is two things:
- A room bible. Before generating anything, write down all four walls: what’s on the left, centre and right of each one, including the wall behind the camera in the original picture. That’s the wall nobody has seen, and it’s the one that drifts. Then, for every camera angle, write what’s frame left, centre and right. Turning 180° swaps left and right, so you work that out on the page, where it’s free.
- Four empty-room images, one per angle, all matching the bible.
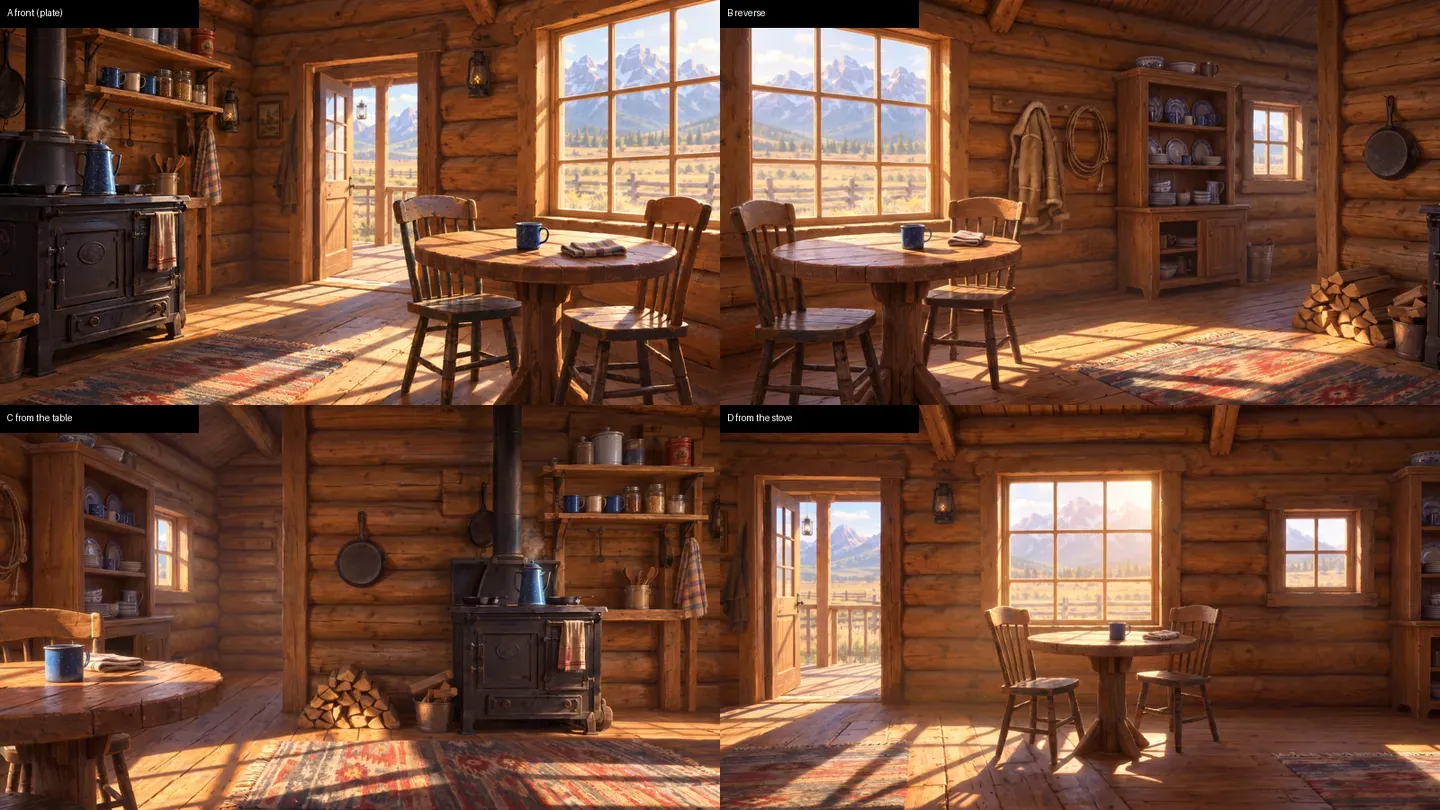
The order matters.
Draw the reverse angle first, from the original picture alone.
Then draw the two side walls from the original plus the reverse, because a side wall needs both ends of the room in view.
If you draw all three from the original at once, each one invents its own back wall and you’re back where you started.
All three new angles came out right first time.
The sheet took about 10 minutes and cost about 6 credits.
Then the real test: a shot of him walking in, hard cut to the reverse angle.
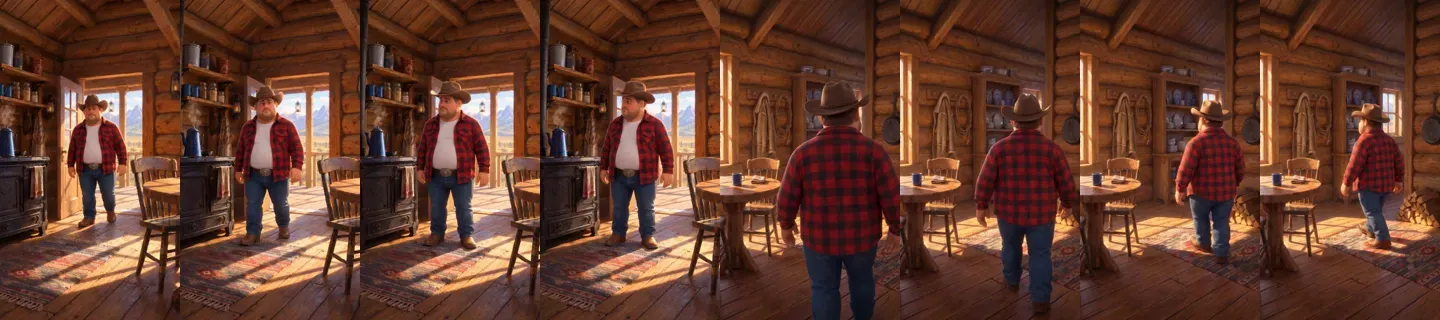
Every wall held across the cut.
Stove and door on the back wall, hutch and peg rail on the front wall, table under the big window.
No second stove, no extra door.
And it’s in the ad’s own style, because it was drawn from the ad’s own picture.
The second clip, a camera arc around him while he pours coffee, held the room too, but with one jump in the middle and a pot that vanished.
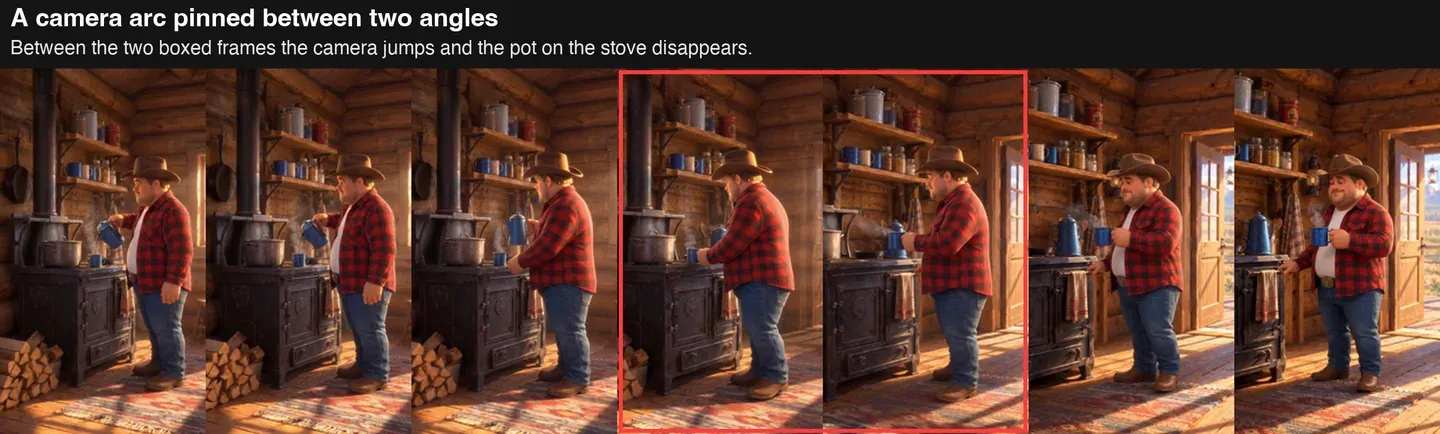
The fix: keep a pinned camera arc to 90° or less.
Beyond that, the model has to invent the space in between.
Two rules came out of this that matter more than the sheet itself:
- A shot starts from the angle it faces, and only that angle. Give the model the original picture on a reverse shot and it pulls the stove back in from it.
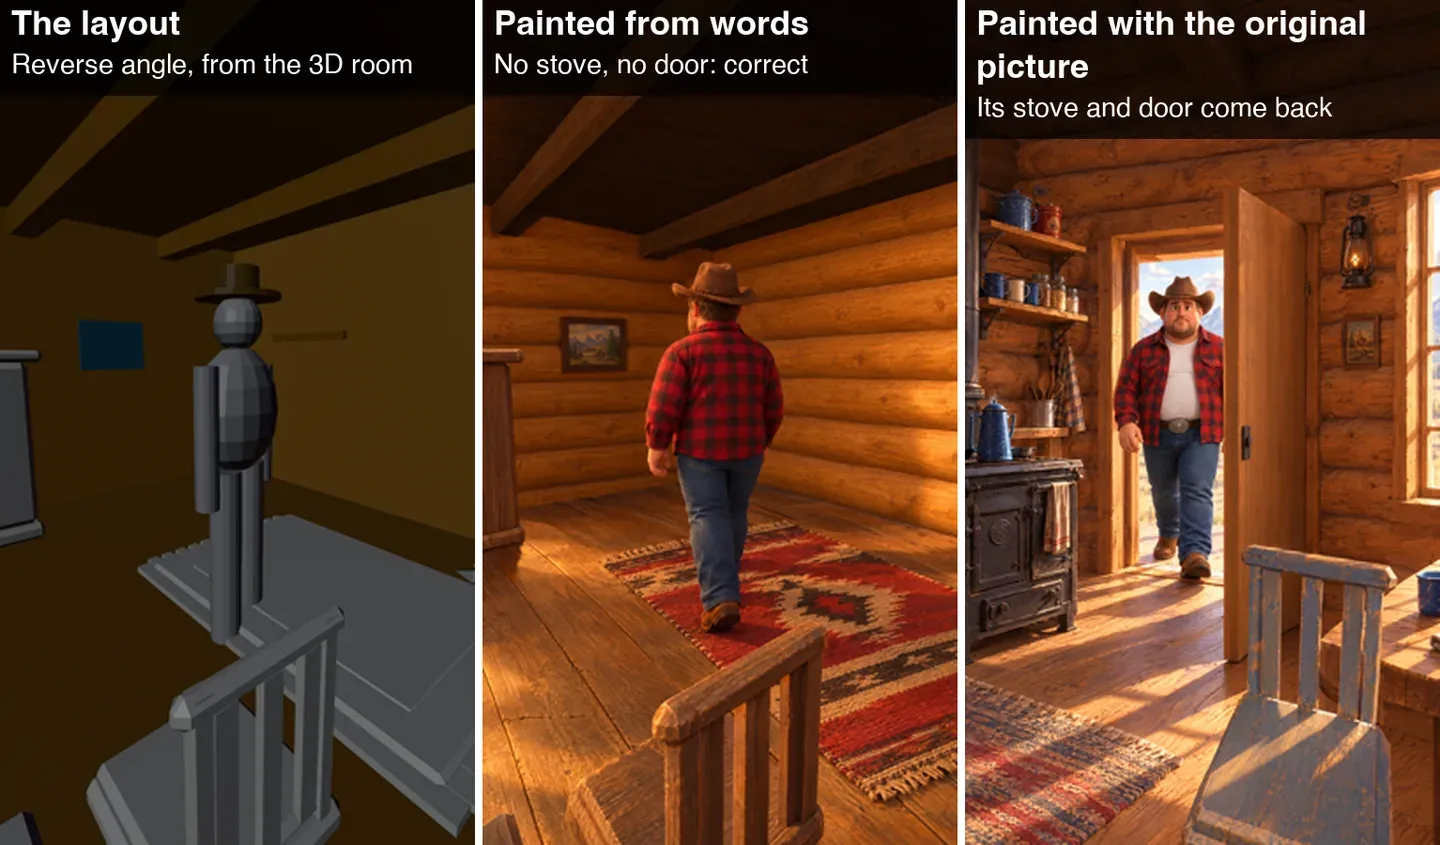
Same layout, same prompt. The only difference on the right is that the original picture was attached, and its stove and door came with it.
- Every prompt says what’s behind the camera and must not appear. That one sentence is what stops a second stove.
And one scoping rule, which was my call: only rooms the camera sees from more than one angle get a sheet.
A room shown once stays a single picture.
Most rooms in a song ad are shown once, so most of the time this costs nothing.
Test 3: start from a real 360° panorama
This one was my idea.
Writing the bible means inventing three walls.
But real rooms already have four walls that agree with each other.
What if we start from a 360° panorama of a real room?
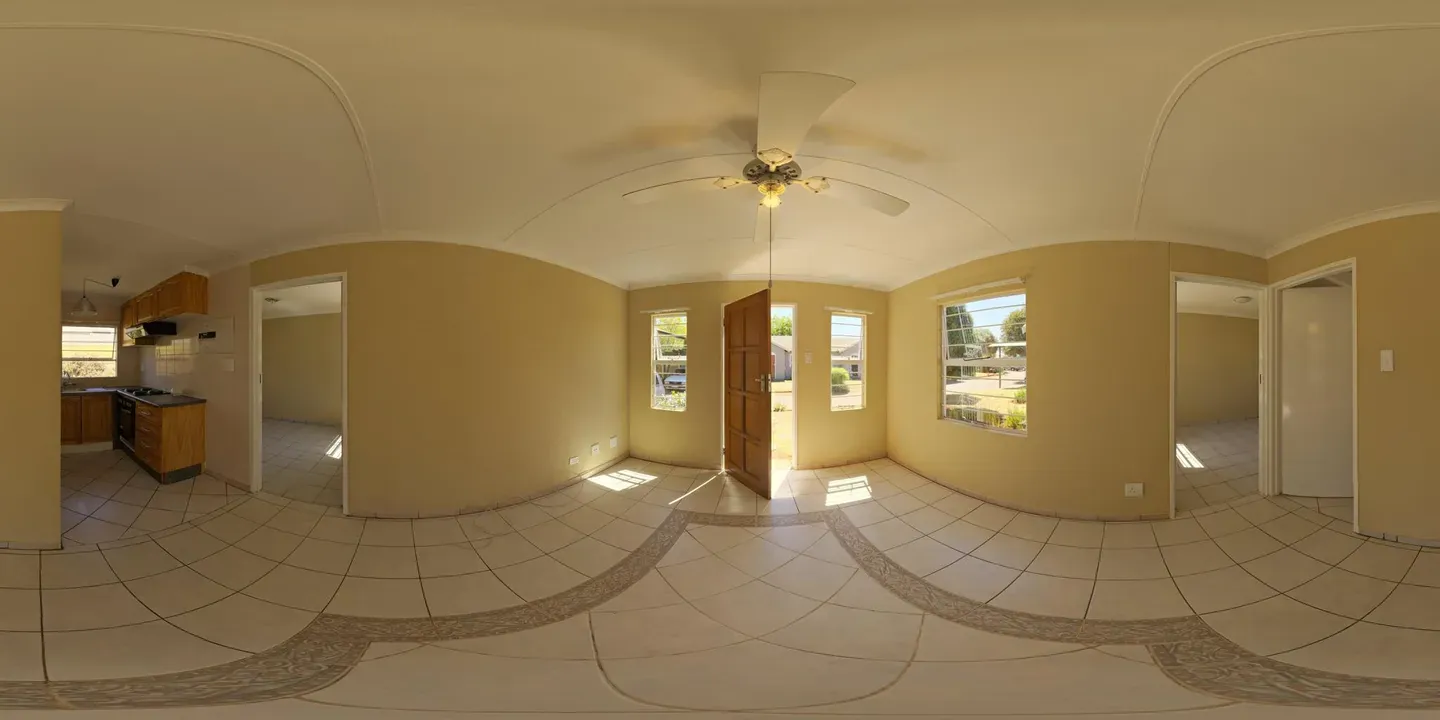
Poly Haven has around 300 free indoor panoramas.
I took a small empty house, gave the whole panorama to GPT Image 2.5 in one go, and asked it to repaint it as the ranch kitchen: log walls, iron stove where the kitchen counters are, plank door, rug.
Keep every wall, window and door exactly where it is.
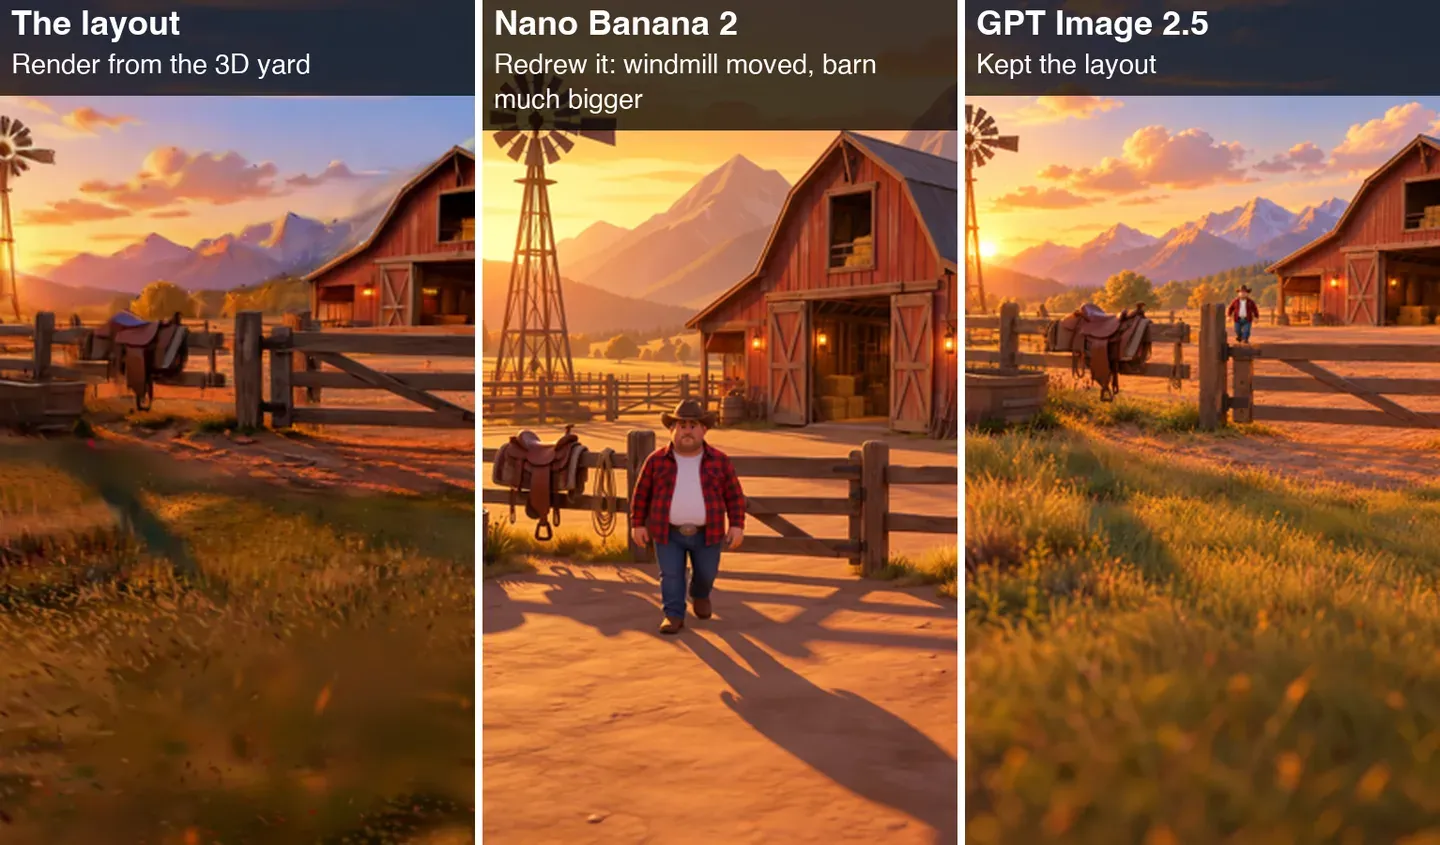
Why GPT Image 2.5 for this job: asked to repaint a layout, Nano Banana 2 redrew the yard. GPT Image 2.5 kept it.
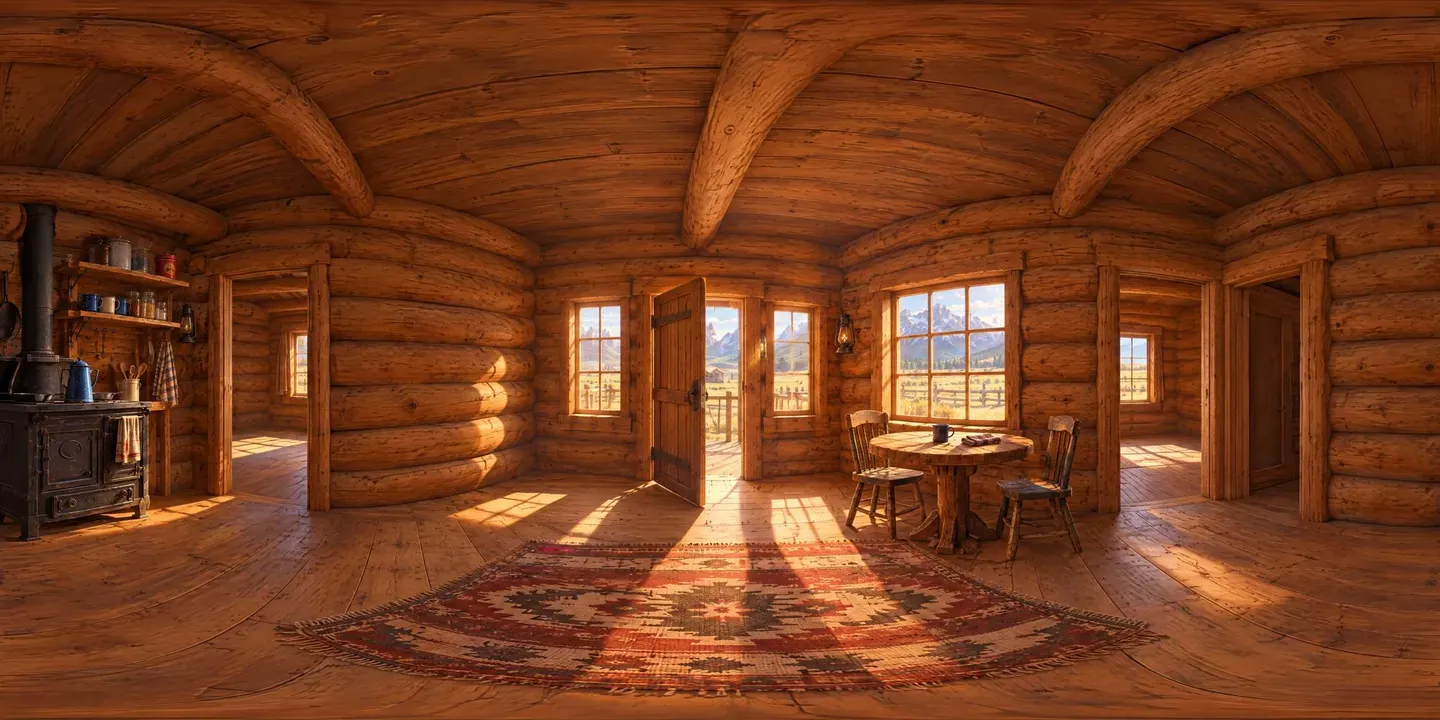
One generation, about a minute, about 4 credits.
Every opening stayed put.
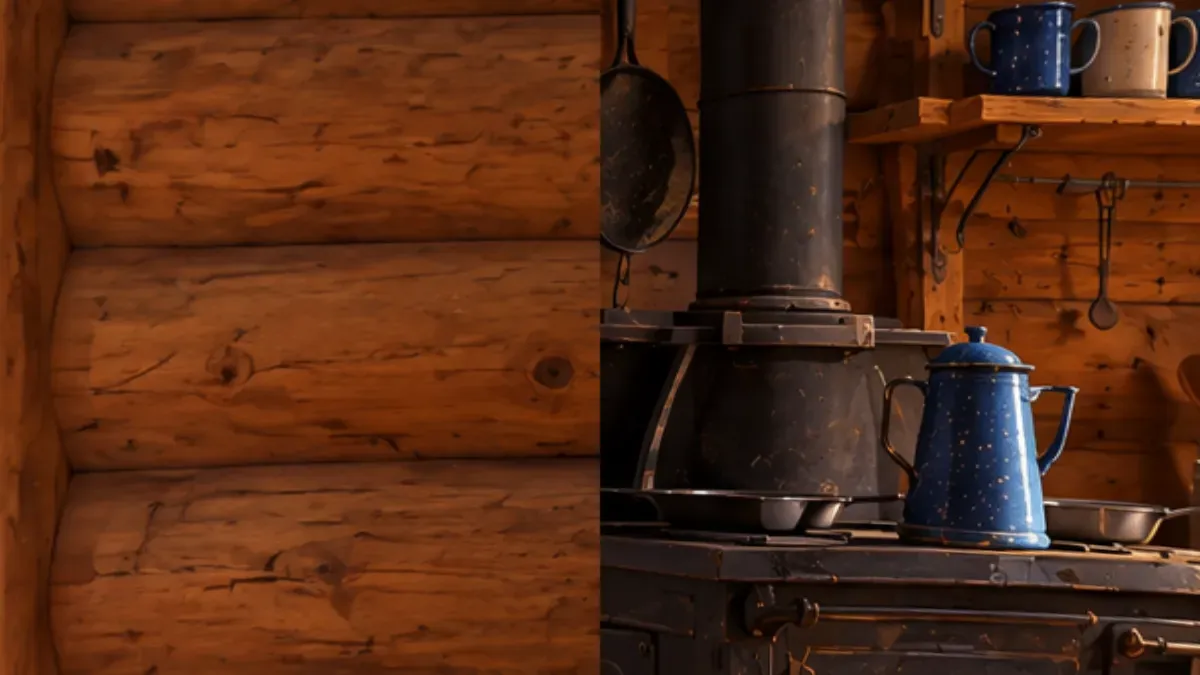
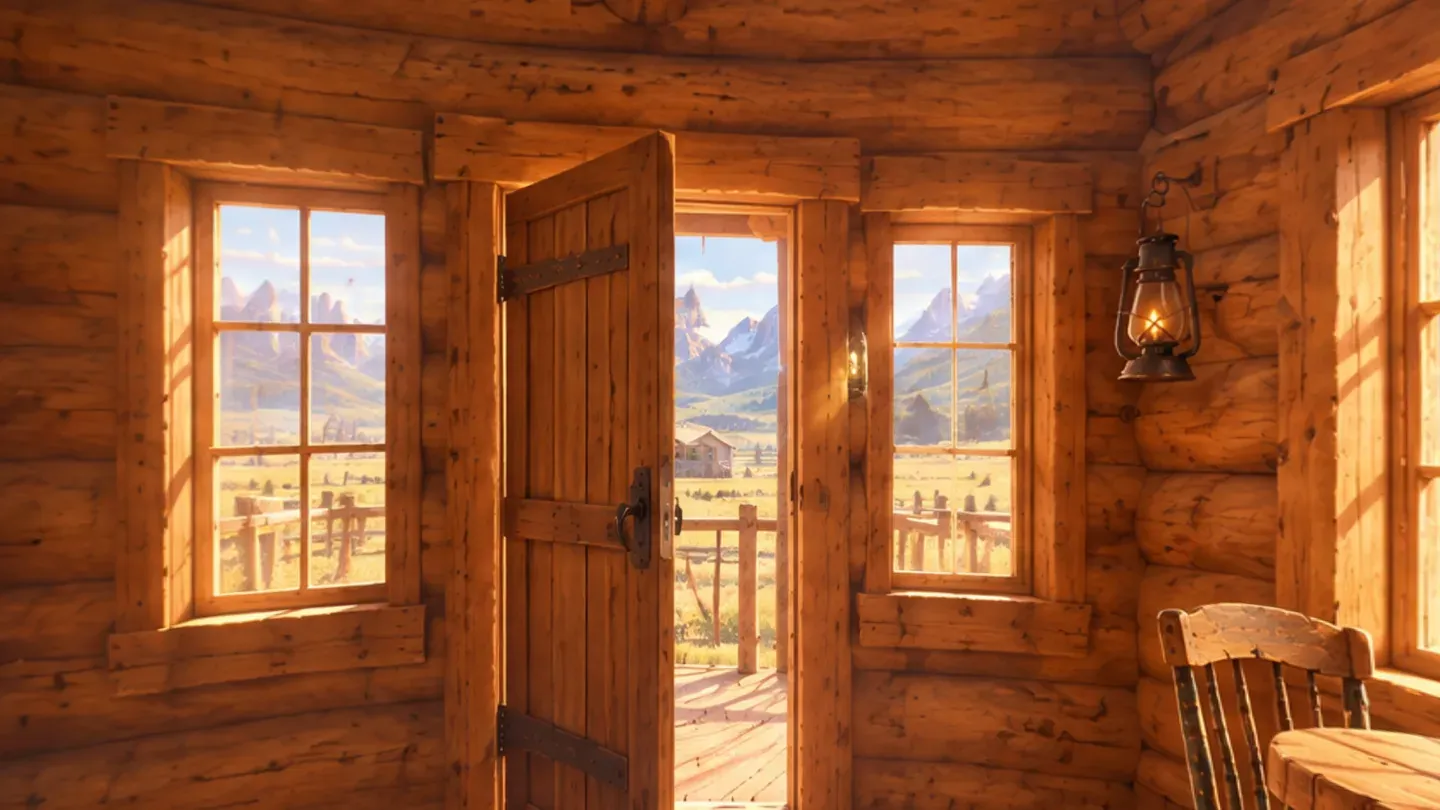
Then a small free script cuts it into four flat views, one per wall:
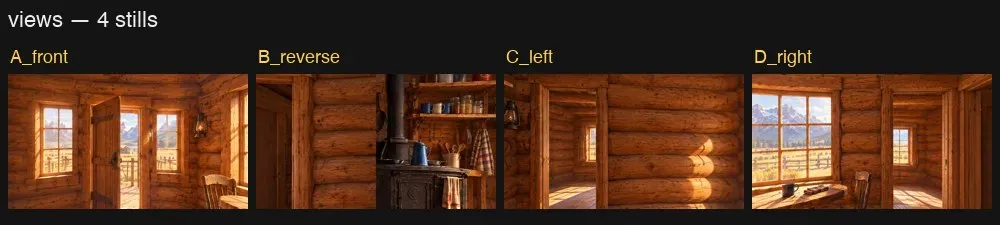
Two catches:
- The seam. A panorama’s left and right edges are the same spot in the room, but the image model doesn’t know that. My stove sat right on the edge and got cut in half. Rotate the panorama so the edge falls on a plain wall before you start.
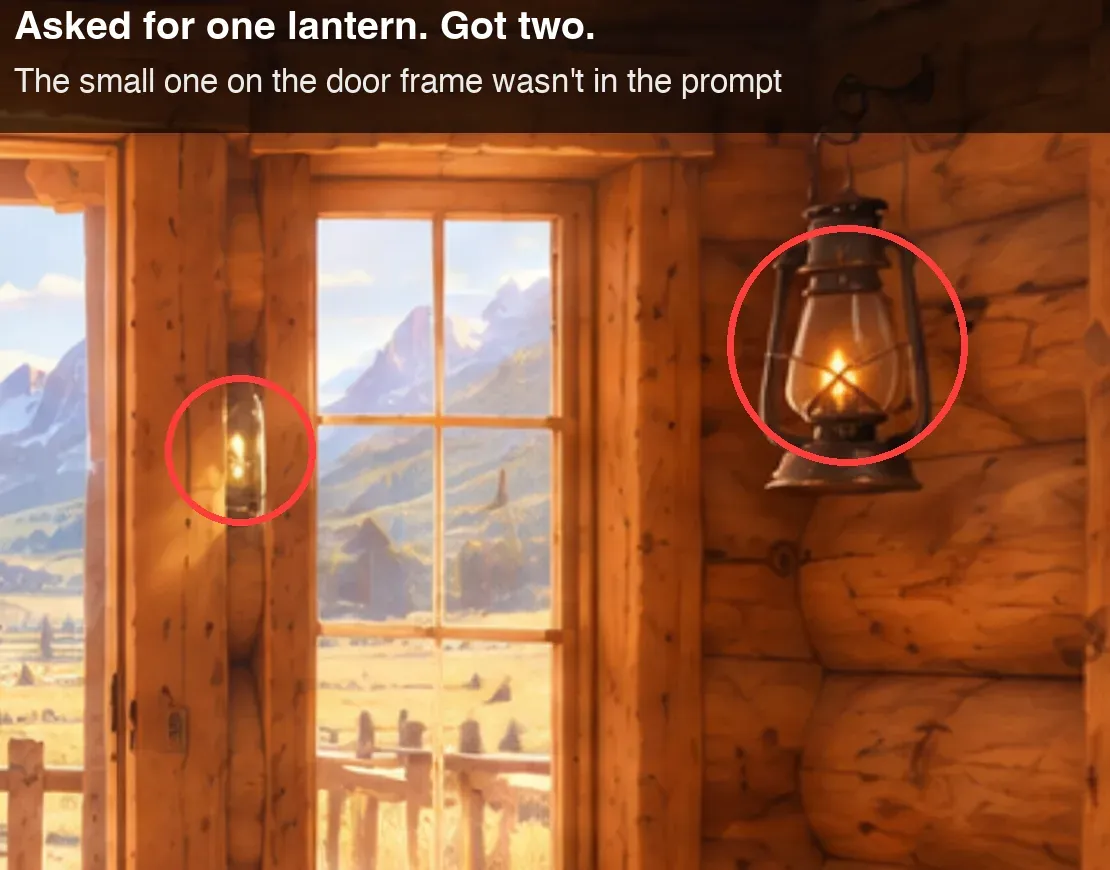
- It still added something. A second small lantern appeared on the door frame, which is exactly the kind of thing I’d been correcting. The sheet reduces stray objects. It doesn’t end them, so you still look at it before approving.
Also, each wall is only about 1,000 pixels wide, so it’s fine as a reference but soft as a start frame.
Upscale those.
One generation for the whole room, instead of three that have to wait on each other.
When a fitting panorama turns up in about five minutes, this is the faster route.
When it doesn’t, the plate route is still good.
The other half: who stands where
Remember the other half of my notes: people in the wrong place.
“She’s on the wrong side of the bed.”
“He’s back on the couch.”
This one doesn’t need a sheet.
It needs one line per scene, and I now put it in every prompt of that scene, word for word:
- Place each person by a landmark of the room, not by left and right: “the window side of the bed”, not “on the left”. Left flips on a reverse angle. The window doesn’t.
- Write their side of the frame for every angle the scene uses.
- If someone moves, their new spot goes in that stage’s end state, so the next stage starts from it.
My prompt checker now warns me when a prompt has two or more people and no blocking line.
It costs nothing to write, and it’s half the problem.
Test 4: fix the clip instead of re-rendering it
Here’s where the real time goes, though.
Not in making the first version: in the corrections.
My old fix for a stray object was a re-render.
And a re-render is a new take.
New performance, new timing, and maybe a new stray object.
Then another round of notes.
Seedance 2.5 has an edit mode: give it a finished clip and change one thing.
I’d never used it.
So I tested it.
Removing objects
Left to right: the original, the blue mug removed, the chair removed.
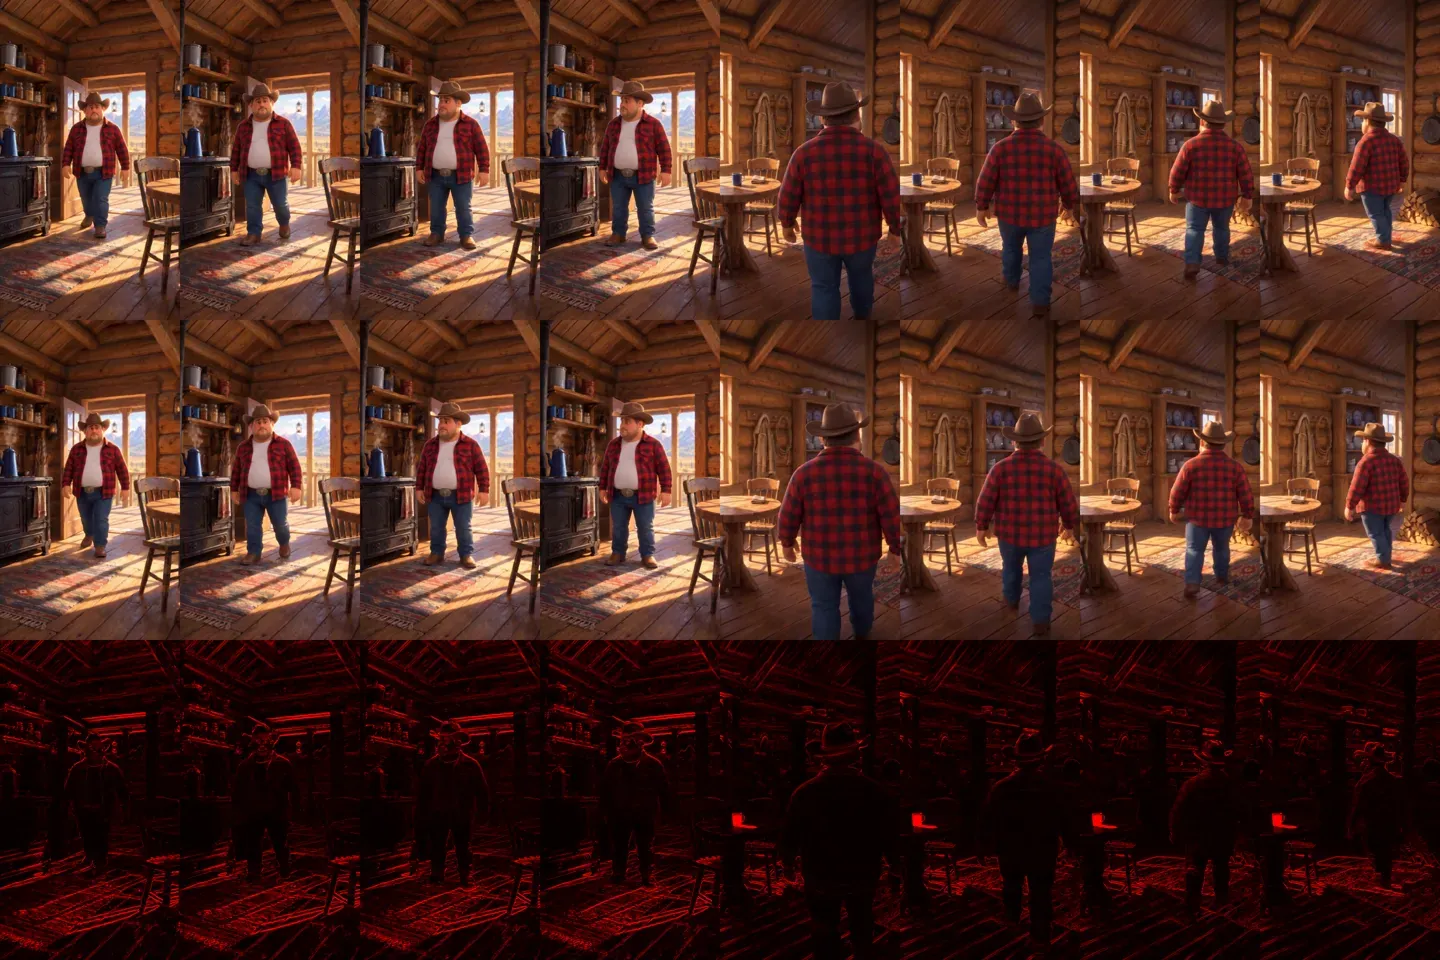
I didn’t trust my eyes on this, so I compared every frame pixel by pixel.
The bottom row is the difference: black means identical.
The only bright patch is where the mug was.
The rancher, his walk, the timing and the cut are the same frame for frame.
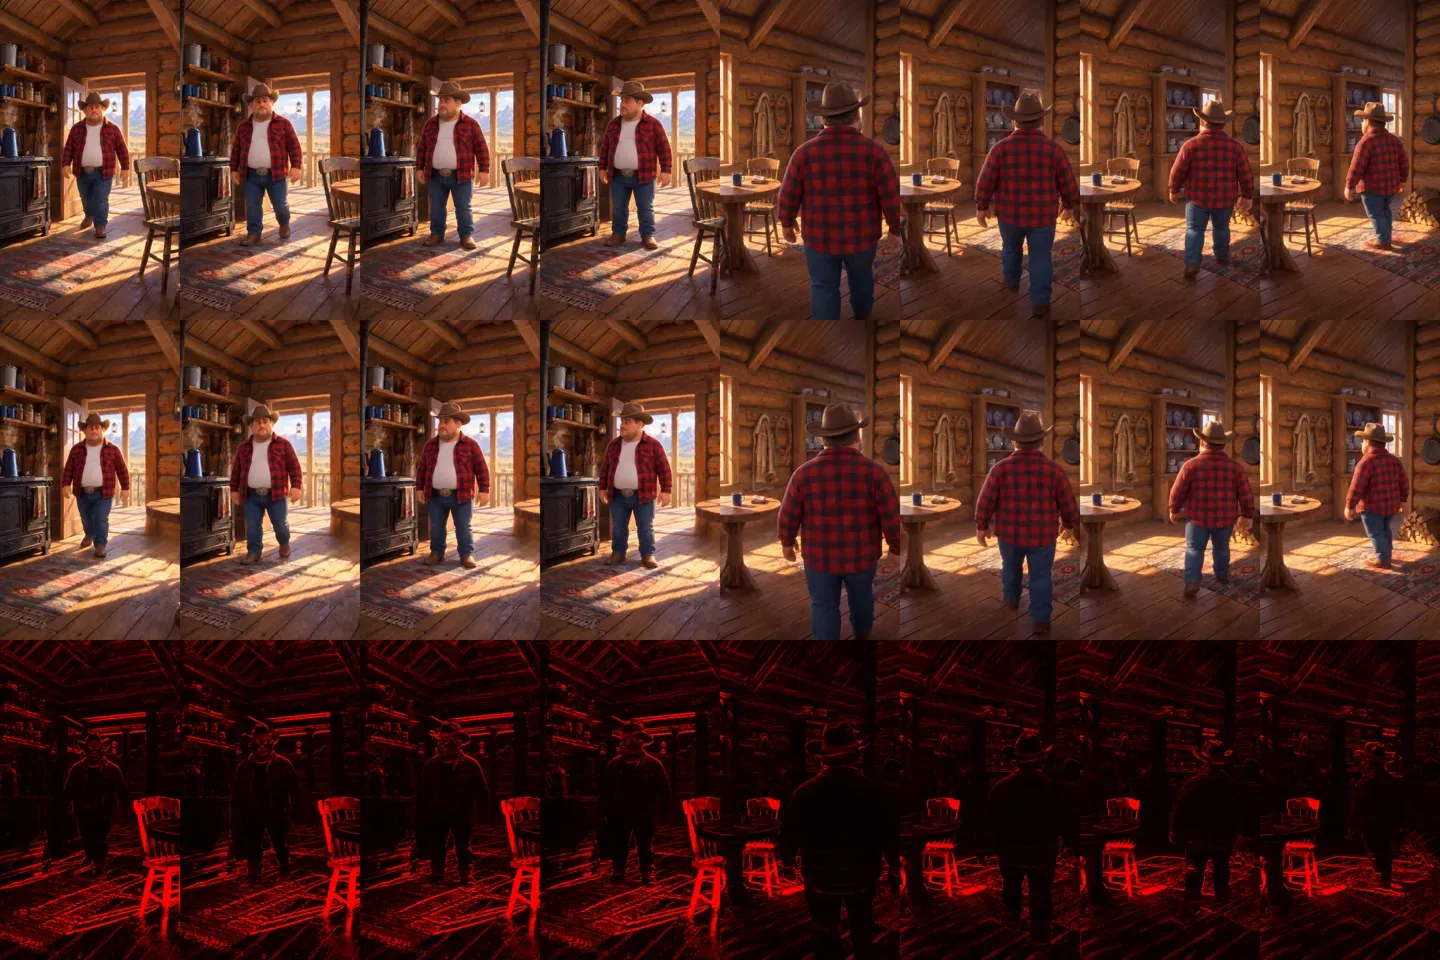
The chair was the harder one, because it’s in both shots and something has to be painted in behind it.
It took it out of both shots, across the cut, and filled in the floor, rug and table edge.
2 for 2.
Changing an action, and fixing the second half
Left to right: original, action edit, camera edit, keep-and-extend, re-render with the old clip as a guide.
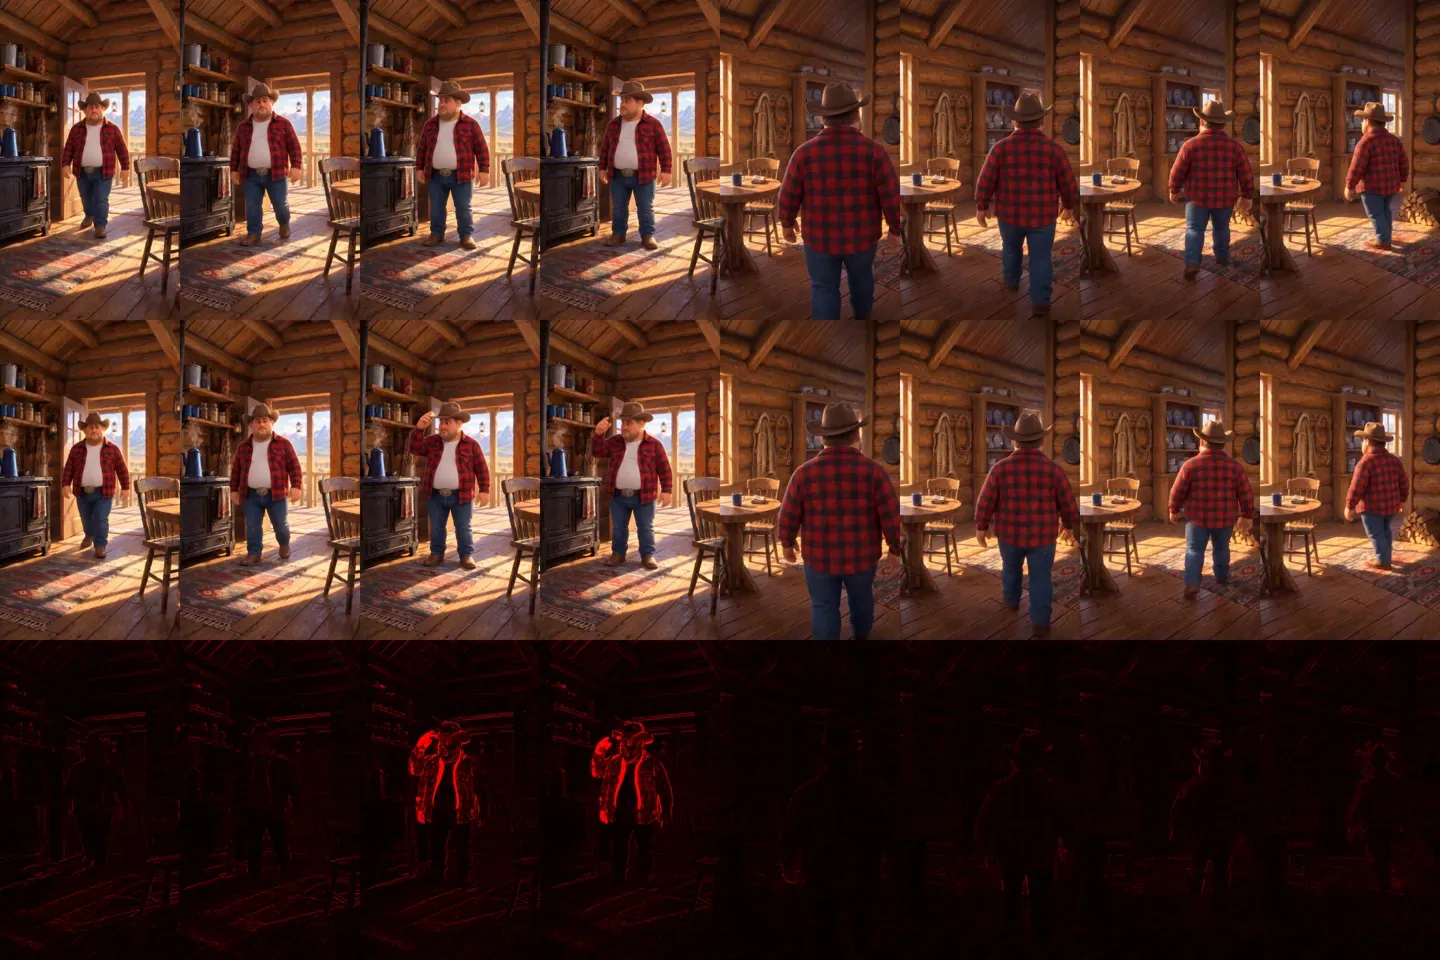
Action edit: “tip his hat instead of glancing at the stove.”
Done.
Only his arm and head changed, and the second shot is untouched (0.1% of pixels).
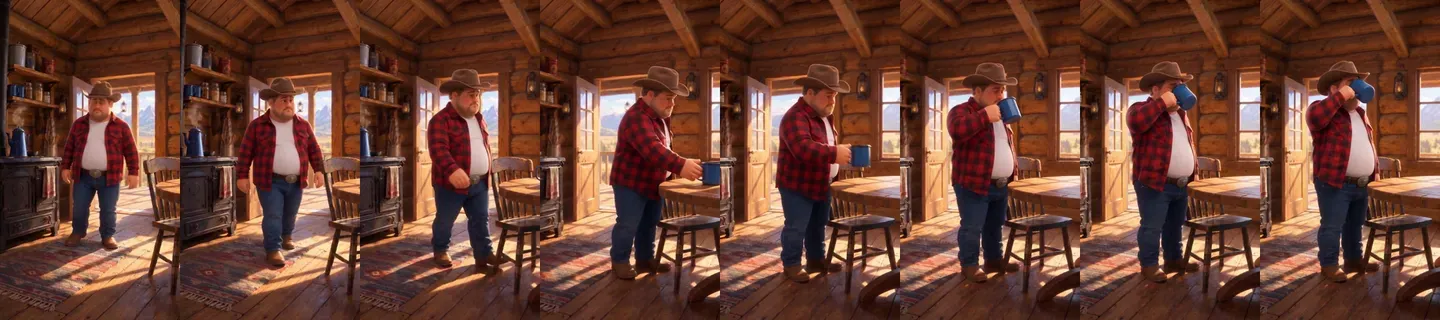
Keep the good part, redo the rest: when a take goes wrong halfway, trim it to the last good frame and extend it forward with the right action.
He picks up exactly where he left off, walks to the table and takes a sip.
The join is as smooth as two neighbouring frames.
And you only pay for the new seconds.
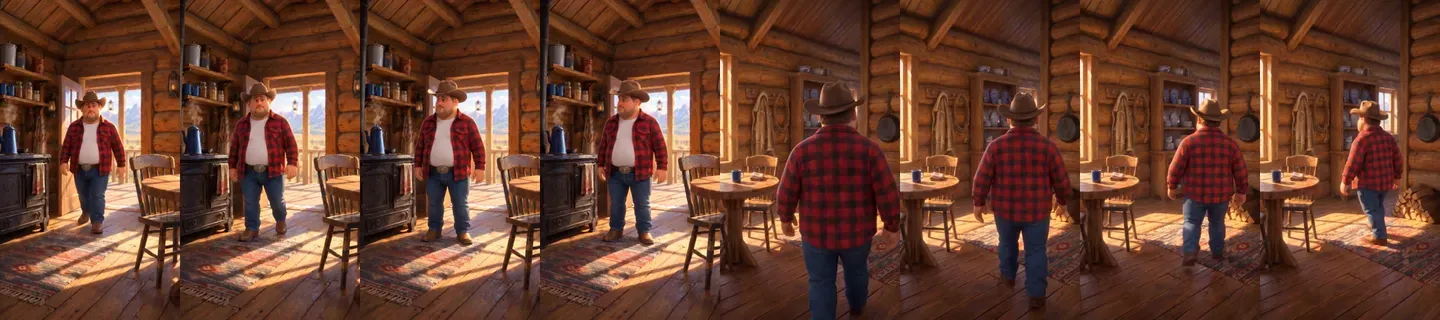
What didn’t work: re-rendering with the old clip as a guide and new camera directions in the text.
It copied the old camera anyway.
A video reference’s camera beats whatever you write.
If you want a new camera, don’t hand it the old clip.
Costs, for the record: an edit costs about the same as a re-render (about 46 credits for 6 seconds) and takes a bit longer, 8 to 10 minutes.
The saving isn’t money.
It’s that you don’t have to watch the whole thing again, because nothing you already approved can change.
Changing the camera after the fact
So the last kind of note: the camera.
“The zoom should be on him, not the centre of the bed.”
That’s a real one from my reviews, and it used to mean a re-render.
I sent the same 5-second porch shot to four models with the same note: slowly push in and follow him, end on a waist-up shot.
Kling’s editor advertises exactly this, and MiniMax H3 was top of the video-editing leaderboard at the time, so I expected one of them to win.
Left to right: original, Seedance 2.5 edit, Kling 3.0 Omni Edit, MiniMax H3, FLUX 3 Video Edit, and a plain crop in the edit.
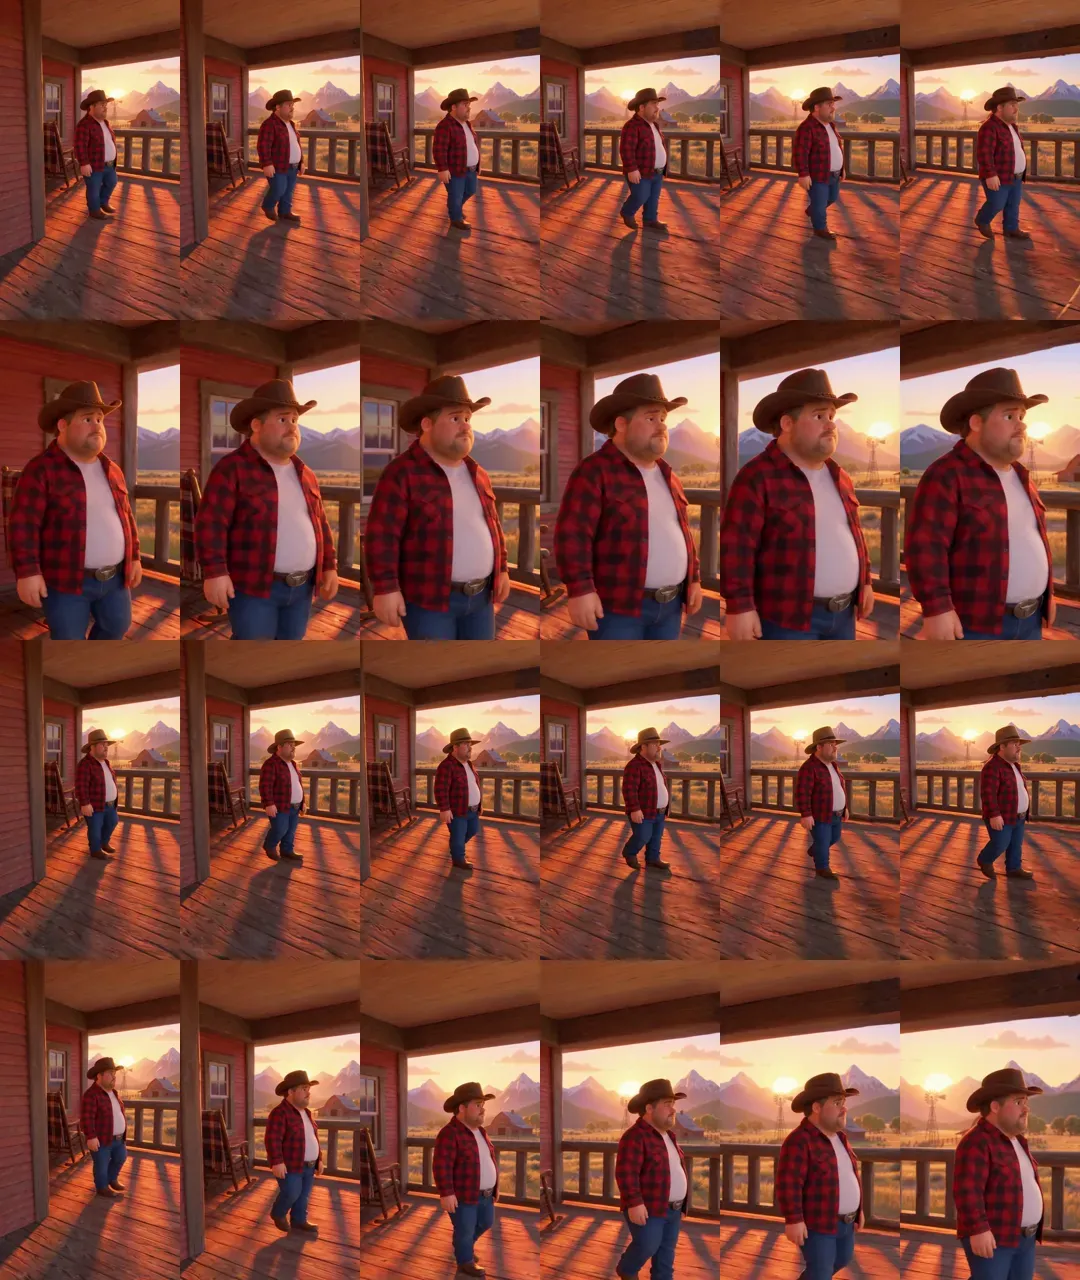
- Seedance 2.5: the only model that moved the camera. But it reframed the whole clip, waist-up from the first frame, instead of starting wide and pushing in.
- Kling, MiniMax, FLUX: handed me back the same clip. I measured it: 2 to 8% of pixels changed, all texture, no camera move.
- A crop in the edit (bottom row): started wide, pushed in, followed him, ended waist-up. Exactly the note. Free, and done in seconds. It gets softer at the tight end, so I upscale it.
Four AI models, and the winner was the oldest trick in editing.
For a push-in, a zoom onto someone or a reframe, don’t touch the AI.
Crop it.
A genuinely new angle, like a reverse or an orbit, can’t be edited in at all.
That’s a new shot, and it’s where the location sheet pays off: you already have that angle drawn.
The rules I run on now
- Characters get a sheet. So do rooms, if the camera sees them from more than one angle.
- Write all four walls before you generate anything, including the one behind the camera.
- Reverse angle first, then the sides. Or start from a real 360° panorama and do it in one pass.
- A shot starts from the angle it faces, and only that angle. Never the original picture on a reverse.
- Say what’s behind the camera and must not appear.
- Cut between angles; keep pinned camera arcs to 90° or less.
- Two or more people: place everyone by a landmark, in every prompt of the scene.
- Fix, don’t re-render. Trim or recut, then crop for camera notes, then an insert, then an edit (objects, actions), then keep-and-extend. Re-render only when it’s a completely different idea.
It’s not progress if you’re paying to re-roll a whole take to move one mug.
FAQ
How do you keep a room consistent across shots in AI video?
Give the model the room from every angle it’ll see, not just one.
Write down all four walls first, generate an empty-room image per angle (reverse angle first), and start every shot from the image of the angle it faces.
Say in the prompt what’s behind the camera and must not appear.
Is a 3D room better than a location sheet?
For pure geometry, yes: a 3D render is exact from every angle.
But it’s slow to build and the result tends to look 3D rather than like your ad.
Location sheets held the room across a reverse cut in the ad’s own style, in about 10 minutes.
Can Seedance 2.5 edit an existing video?
Yes.
Its edit mode takes one finished clip and changes one thing: remove or swap an object, change an action within a time range, adjust the camera.
In my tests, everything I didn’t name stayed identical frame for frame.
It costs about the same as a re-render.
Can you change the camera move of an AI video after it’s rendered?
A push-in or a reframe, yes, and the best tool is a crop in the edit, not an AI model.
In my test, Seedance 2.5’s edit mode reframed the shot rather than moving from the original, and Kling 3.0 Omni Edit, MiniMax H3 and FLUX 3 Video Edit returned the clip unchanged.
A completely new angle needs a new shot.
Why do AI characters end up on the wrong side of the bed?
Because “left” and “right” flip when the camera turns around.
Place people by fixed landmarks (“the window side of the bed”) and write their frame side for every angle in every prompt of the scene.
Do I need a location sheet for every room?
No.
Only rooms the camera sees from more than one angle.
A room shown once stays a single picture.